Copyright © 2001, William Weiland
Sort your shipping methods by cost, module name, or method name. The free shipping option can be implemented when the subtotal of the order or the number of products in the order exceeds the thresholds you establish in admin. You can also specify a weight that can be shipped "up to" that will be free. You can further configure the free shipping option by limiting it to specific countries. You can also remove the free shipping option if certain products are ordered. It also has free shipping override, ie if every product in the basket is in your list of free shipping codes, then shipping is free no matter what the other parameters are set to.
NOTE: These instructions are for the Sort Shipping Plus Free Shipping Module version 5.0200 or newer. That version was released on July 31, 2008. If you have an older version, please update from the store you got the original. These instructions will not work with the older version.
1) In admin, click Add Modules link (fig 2)
2) Click the file upload button
3) Browse to find the sortship.mvc file on your hard drive and upload (fig 3)
4) Click Add to add it to the domain
5) Then in admin click on the plus to the left of Stores
6) Click the plus to the left of your store name
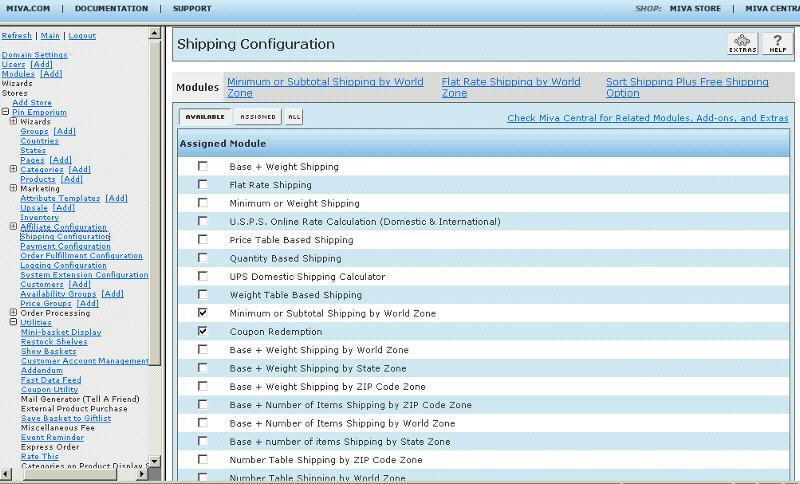
7) Click on the link for Shipping Configuration under your store (fig 8)
8) Check the box next to Sort Shipping Plus Free Shipping Option
9) Click Update
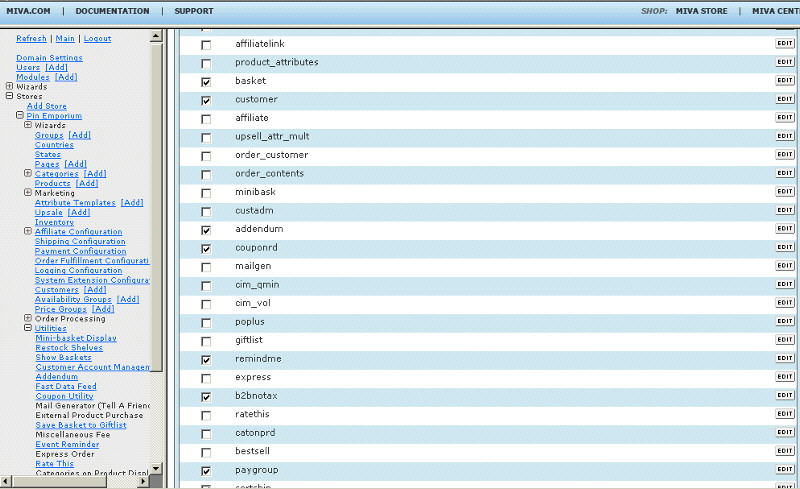
10) Click on System Extension Configuration link
11) Check the box next to Sort Shipping Plus Free Shipping Option
12) Click Update
13) Click Pages link to get to the User Interface (fig 4)
14) Click Items link at the top of the User Interface page (fig 5)
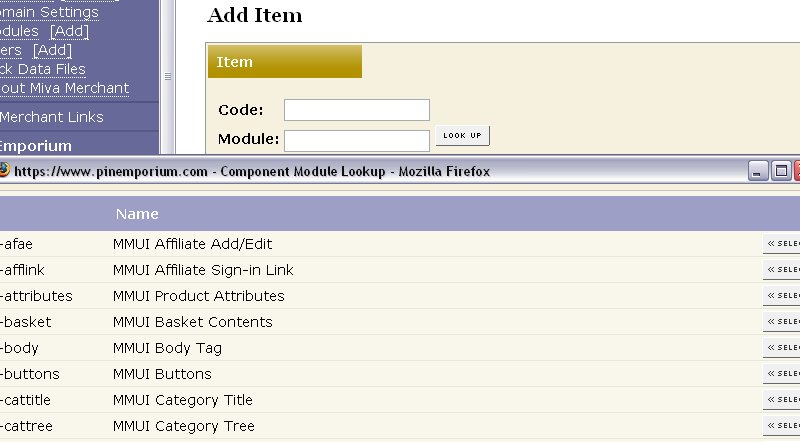
15) Click the Add Item button (fig 6)
16) Enter sortship for the code
17) Look up and scroll to the last page of items and Sort Shipping Plus Free Shipping Option should be at the end of the list of items
18) Select Sort Shipping Plus Free Shipping Option
19) Click the Add button to assign the module
20) Configure the module as below
21) Edit the templates as below
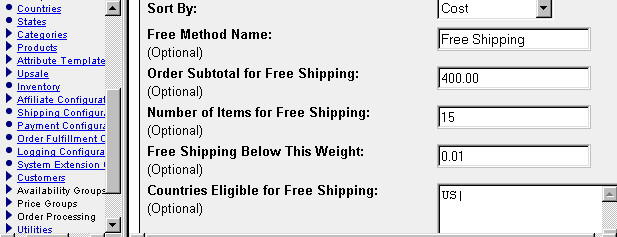
Enter data into the applicable input field (fig 9).
Sort By
Select the sort order.
Free (reduced) Method Name
Enter the label you want to appear in Merchant for the free or reduced shipping method.
Free (reduced) Method Cost
Normally, this value would be 0.00. However, if you want to have a reduced shipping cost, enter that
value, e.g. 3.00.
Order Subtotal for Free Shipping
If you want to give free shipping if the sum of the products exceeds a certain amount, enter
that amount. If you do not, then put a number higher than an order subtotal would
ever get, e.g. 999999.99
Free Shipping Below This Weight
If you want to give free shipping if the weight of the order is less than a
certain amount, enter that number. If you do not, then put in 0, as the
order would never weigh less than 0.
Number of Items for Free Shipping
If you want to give free shipping if the number of items in the order exceeds a
certain amount, enter that number. If you do not, then put a number higher
than an order would ever have, e.g. 9999
Availability and Price Groups
If none of the other options above apply, you can still give free shippings
to members of specific availability or price groups.
Countries Eligible for Free Shipping
If you want to limit the free shipping option to one or more countries, enter
their country code in the input. Separate each with the | delimiter. If you do
not want to limit free shipping to specific countries, leave this input blank.
Product Codes Which Cancel Free Shipping
In some cases you may have products that are very heavy or very expensive to
ship and you do not want to offer a free shipping option for them. If so, enter
their codes into the input. If any of them appear in the order, shipping will
not be free and your other shipping modules will calculate the shipping cost.
When Order Contains Only These Product
Codes Customer Gets Free Shipping
This option overrides all other trigger amounts above. Enter product codes for
all products which have free shipping; e.g. gift certificates, software delivery
over the Internet, very light items, etc. Terminate each product code with the | character. If
every product in the basket is in this list of codes, the free shipping will be
available to the customer. Beginning with version 5.0250 of the module there is an exception to this.
If you put the # character at the very
beginning of the list of product codes, then any product in the basket which is also in the list, will give
free (reduced) shipping to the entire order. Thus you may have one product in the basket that is in the
list and several others that are not. This exception would be used if you are running some sort of special,
i.e. buy product X and your entire order ships free. As with the normal use of this feature, it overrides all other
triggers in the module. So you can't combine this feature with the order subtotal and only get the free shipping
when orders exceed a certain amount. Using this feature, the module skips all other rules.
Module - Method Location Restriction
You can restrict a module and method to specific countries if not already restricted by the shipping module.
The syntax for each restriction is: module code|method|country codes list separated with , and ended with ^.
Example: flatrate|Ground Shipping|+US,CA,MX^
You can determine the module code and method by viewing source on the OSEL screen.
The module codes and methods are case sensitive.
You can replace the method with * if you want all methods in this module to use the same rule.
Begin the country code list with a + to include all listed or a - to exclude all listed.
If you use the "-" it may also eliminate the country which could have been picked up in the catch all zone "WORLD"
in world zone and "COUNTRYWIDE" in state or zip code zone modules. Test to see the effects of using the "-" with your
installed shipping modules.
The two letter country codes are separated with a comma and no spaces in between. USX and US48 cannot be
used with this input. The line for each rule is ended with the ^ character.
HTML/Text Message for Selected Method
You can have a different message for each shipping method. The html
message can be displayed on the order payment and invoice screens and
in html based notification emails which allow use of tokens in the format
%module|sortship|html_message%. Our Mail Manager module can process this
type of token in html based notification emails. The text message can be
used in notification emails which allow use of tokens in the format
%module|sortship|text_message%.
Enter messages in the input as module code|method|message and ended with ^.
Example: flatrate|Ground Shipping|Average delivery time is <b>7-10 days</b>^.
The module is called within the template screens with render tokens. They are in the format of
<mvt:item name="itemcode" param="xxxx" />
Templates are listed at the Pages link. You will edit the templates by inserting the tokens and clicking the Update. Important: After adding the render token to a template page, you must click the Items link for that page, scroll down to the item name and assign it to the page.
You can optionally display a message about the selected shipping method on the 'OPAY' (order payment) and 'INVC' (invoice) screens using render tokens. For the order payment screen, use the render token
<mvt:item name="sortship" param="opay" />
and on the invoice screen token
<mvt:item name="sortship" param="html_message" />
Place the token in the location you want them, probably under the list of products in the basket/order. Don't forget to assign the "sortship" item to the items list of the OPAY and INVC pages.
If you choose to include the select one as an option in the drop down list, a customer could fail to make a selection. At this point you would want the screen to redisplay and an error message to display. You can put the following token on the OSEL page template to display an error message.
<mvt:item name="messages" />
Then in the items list for the OSEL page, assign the "messages" item to the page.
Required: Now assign the "sortship" item to the items list of the OSEL (shipping/payment selection) page.
Optional: You don't have to edit the page template, however you may want to change the user interface. Below are examples of displaying the shipping methods as a drop down list or as radio buttons. Use either drop down or radio, but not both. You can change the colors and fonts or add css based on your needs.
Top portion (both styles)
<mvt:if expr="NOT ISNULL l.settings:shippingmethod_header">
<tr>
<td align="left" bgcolor="#d3d3d3" colspan="2">
&mvte:shippingmethod_header;
</td>
</tr>
</mvt:if>
<tr>
<td align="left" valign="top" bgcolor="#00d3ff">
<mvt:if expr="g.error_messages AND NOT g.ShippingMethod">
<font face="Arial, Helvetica" size="2" color="red">
<mvt:else>
<font face="Arial, Helvetica" size="2">
</mvt:if>
<b>Shipping Options:</b>
</font>
</td>
<td align="left" valign="top" bgcolor="#ffff00">
<mvt:item name="fonts" param="body_font">
Radio button style
<mvt:if expr="l.settings:shippingmethod_count EQ 1">
<mvt:foreach array="shippingmethods" iterator="method">
<input type="hidden" name="ShippingMethod" value="&mvte:method:module;:&mvte:method:code;">&mvt:method:name; (&mvt:method:formatted_price;)<br>
</mvt:foreach>
<mvt:else>
<mvt:foreach array="shippingmethods" iterator="method">
<mvt:if expr="(pos1 EQ 1 AND (NOT g.ShippingMethod))">
<input type="radio" name="ShippingMethod" value="&mvte:method:module;:&mvte:method:code;" checked>&mvt:method:name; (&mvt:method:formatted_price;)<br>
<mvt:else>
<mvt:if expr="g.ShippingMethod EQ l.settings:method:module$':'$l.settings:method:code">
<input type="radio" name="ShippingMethod" value="&mvte:method:module;:&mvte:method:code;" checked>&mvt:method:name; (&mvt:method:formatted_price;)<br>
<mvt:else>
<input type="radio" name="ShippingMethod" value="&mvte:method:module;:&mvte:method:code;">&mvt:method:name; (&mvt:method:formatted_price;)<br>
</mvt:if>
</mvt:if>
</mvt:foreach>
</mvt:if>
Drop down select style
<select name="ShippingMethod">
<mvt:if expr="l.settings:shippingmethod_count EQ 1">
<mvt:foreach array="shippingmethods" iterator="method">
<option value="&mvte:method:module;:&mvte:method:code;">&mvt:method:name; (&mvt:method:formatted_price;)</option>
</mvt:foreach>
<mvt:else>
<mvt:if expr="NOT g.ShippingMethod">
<option value="" selected>Select One</option>
<mvt:else>
<option value="">Select One</option>
</mvt:if>
<mvt:foreach array="shippingmethods" iterator="method">
<mvt:if expr="g.ShippingMethod EQ l.settings:method:module$':'$l.settings:method:code">
<option value="&mvte:method:module;:&mvte:method:code;" selected>&mvt:method:name; (&mvt:method:formatted_price;)<br>
<mvt:else>
<option value="&mvte:method:module;:&mvte:method:code;">&mvt:method:name; (&mvt:method:formatted_price;)<br> </mvt:if>
</mvt:foreach>
</mvt:if>
</select>
Bottom portion (both styles)
<mvt:if expr="ISNULL l.settings:shippingmethods">
No valid shipping methods are available for your order.
</mvt:if>
</mvt:item>
</td></tr>
Q: I set the free shipping to kick in at $200. However, even when orders are less than $200, it is showing free shipping.
A: The module's initial installation defaults to no free shipping. You probably changed more than just the Order Subtotal for free shipping. The initial settings are:
Subtotal 99999.99
Number of itmes 99999
Weight 0
With those settings, the free shipping would not likely occur for those conditions. However, if you changed Subtotal to 200.00 and also changed number of items to 1, then you would get free shipping if the order contained one or more items. Take a look at the description of the conditions above.
Q: The shipping methods do not appear to be sorted.
A: Double check the items list on the OSEL page to make sure that the sortship item is assigned.
Q: In the input "Module - Method Location Restriction", the US48 doesn't seem to work correctly.
A: Per the instructions above, "The TWO letter country codes are separated with a comma and no spaces in between. US48 cannot be used with this input. There is an exception. The USX can be used."
Still have a question?


