Copyright © 2000, William Weiland
Manage coupon addition and redemption functions within a MIVA Merchant 5.x storefront with this plugin module.
You will install three modules (couponrd.mvc, couponrp.mvc, cim_log.mvc).
These instructions are for Coupon Redemption module version 5.049 (Mar 8, 2010) and newer. If your version is older, you need to update before proceeding. You get the latest version per these Instructions If you purchased the module within the last 60 days, you can get the update free by using the Request Form. Parts of these instructions related to a newer version of the Coupon Redemption module.
If you are having a problem, most are addressed in the Frequently Asked Questions section below.
Install couponrd.mvc
1) In admin, click Add Modules link (fig 2)
2) Click the file upload button
3) Browse to find the couponrd.mvc file on your hard drive and upload (fig 3)
4) Click Add to add it to the domain
5) Then in admin click on the plus to the left of Stores if it is not already expanded
6) Click the plus to the left of your store name if not already expanded
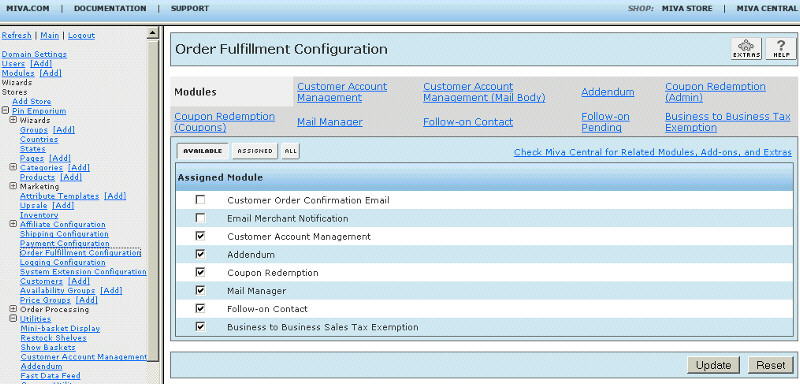
7) Click on Order Fulfillment Settings link (fig 9)
8) Check the box next to the Coupon Redemption
9) Click Update
10) Click on System Extension Settings link
11) Check the box next to the Coupon Redemption if not already checked
12) Click Update
13) Click on the Shipping Settings link
14) Check the box next to the Coupon Redemption if not already checked
15) Click Update
Install couponrp.mvc
16) Again, click Add Modules link
17) Click the file upload button
18) Browse to find the couponrp.mvc file on your hard drive and upload
19) Click Add to add it to the domain
20) Click on the word Utilities
21) Check the box next to the Coupon Utility
22) Click Update
23) The CIM Activity Log (cim_log.mvc) may already be in your store as it is used by many of our modules. Check under the Modules link to see if it is already there. If it is there, skip to 32. If not, then go to 24. After installing or updating the CIM Activity Log, the version of that module MUST be 5.020 or newer (if the coupon module is 5.058 or newer). This is VERY IMPORTANT! If it is not, the coupon module will not work correctly.
Install cim_log.mvc
24) Again, click Add Modules link
25) Click the file upload button
26) Browse to find the cim_log.mvc file on your hard drive and upload
27) Click Add to add it to the domain. Verify the version is 5.020 or newer (if the coupon module is 5.058 or newer).
28) Click on the Logging Settings Link
29) Check the box next to the CIM Activity Log
30) Click Update.
31) Skip to 37
Update cim_log.mvc
32) Click Modules link
33) Scroll down to CIM Activity Log and click the button
34) Click the file upload button
35) Browse to find the cim_log.mvc file on your hard drive and upload
36) Click Update to update the module. Verify the version is 5.020 or newer (if the coupon module is 5.058 or newer). Also, make sure it is assigned under the Logging Settings link.
Configure the module
37) Return to the Order Fulfillment Settings screen and click the link for Coupon Redemption to enter the configuration settings and to add coupons. Enter the order number and where you purchased the license from then click update. Beginning with version 5.038 of the module you will also need to supply a license key. This is not the download key you may have received when you purchased the license, as some vendors have their own license system. This license key is obtained directly from Emporium Plus. If you purchased from Emporium Plus, the key may have been included in the delivery email. If you purchased from other than the Emporium Plus store or it was not in the Emporium Plus delivery email, you can get it by clicking the link to "Request License Key" in the module's admin screen. 1) enter your order number and where you got it, 2) click Update, 3) request the key. Make sure the order number, domain, and store code are correctly inserted in the request form and the order number is in the subject. The license key is based on these three elements. If you provided that info, the key will be sent back to you. After entering the key and saving, the module will be available for use in your store past the initial 10 days. DO NOT SKIP STEP 38.
Editing Requirements
38) After configuring the module, insert the tokens per the Editing Requirements section below. The coupon prompt will not show on the pages until you have done the page template editing.
Coupon Utility
39) Beginning with version 5.058 of the coupon module you will also need to supply a license key in the Coupon Utility module version 5.012 or newer. The Coupon Utility module admin is viewed by clicking the + to the left of the WORD "Utilities". Then click the link for Coupon Utility. Like the coupon redemption module license key this license key is obtained directly from Emporium Plus. If you purchased from Emporium Plus, the key may have been included in the delivery email. If you purchased from other than the Emporium Plus store or it was not in the Emporium Plus delivery email, you can get it by clicking the link to "Request License Key" in the module's admin screen. 1) enter your order number and where you got it, 2) click Update, 3) request the key. Make sure the order number, domain, and store code are correctly inserted in the request form and the order number is in the subject. The license key is based on these three elements. If you provided that info, the key will be sent back to you. After entering the key and saving, the module will be available for use in your store past the initial 10 days. If you do not enter the license key and save it, the points redemption feature will not work.
The paragraphs below describe each input you will encounter in the coupons and admin tabs. Please review all of these as you configure the module. In addition to the below, we have added CONTEXT SENSITIVE HELP to the admin inputs. Click the bold "context sensitive help" in this paragraph to see how it works. Make sure you are allowing popups.
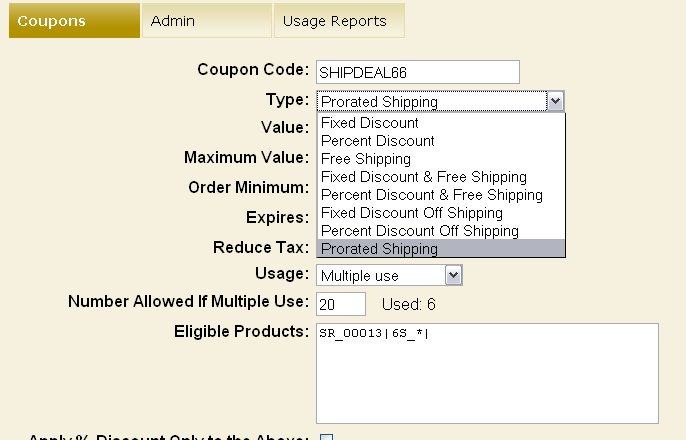
An unlimited number of coupons can be assigned to the store and each identified with a coupon code. Once you have added the module to the store, you can add coupons in the Order Fulfillment section. Click the tab labeled Coupons. When you select the Add Item button, you will have several input fields to fill in.
Coupon Code Type Fixed Discount Fixed Discount as Attribute Percent Discount Percent Discount as Attribute Free Shipping Discount Shipping Prorated Shipping - Free Shipping For Specified Products Free Product BOGO (Buy One Get One) Combo Fixed Discount Combo Percent Discount Percent Off Highest Priced Item Percent Off Lowest Priced Item Redemption Value Tiers Maximum Value Order Minimum Start Date Expires Reduce Tax Coupon Usage Eligible Products Instant Coupons Price Group Restriction Coupon Label Zone (Location) Restriction Google Checkout Module and Coupons Finding Specific Coupons or Lists of Coupons Deleting Coupons
Now click the tab labeled "Admin". You may not want to change any of these entries initially. Once
you get used to the module and its features, you will probably want to fine tune some of these settings.
Coupon Prompt Text Coupon Prompt Image Virtual URL Instant Coupon Prompt Instant Prompt Image Virtual URL Error Messages Limit Number Coupons Per Order Coupon Labels Instant Coupon Usage Hide Coupon Prompts from ALL price group customers Hide Coupon Prompts from these price group customers
You must enter a unique code for your coupon. This
is the code that you will give to customers so they can shop and redeem
the coupon. It can be any combination of letters and/or numbers. If this is going to be a
coupon template which is used for the auto-generation of sub-coupons, there are other characters
which are used. See the paragraph on "Coupon Code Generator" below for more information on those.
There are several different coupon types. Choose from the drop down. Following this list
is a more detailed explanation of the types.
This subtracts the value you set from the order total. For example, if the value is 5.00, it will
subtract $5.00 off the order total.
This discounts a fixed amount off products. The discount will be a negative value attribute. Thoroughly
test this type of coupon to be sure it works as you understand it to work. Can only be used in stores
using the MySQL database.
This multiplies the subtotal of the order times the percent discount and subtracts it from the order
total. For example, if the value is 10.00, it will multiply .10 times the order subtotal, then
subtract that amount from the order total. The order subtotal can be the sum of all the product prices
or it can be the sum of just some of the product prices. See the eligible products paragraph below for
more details.
This discounts like the regular percent discount except the discount is a negative attribute of products
rather than a separate line item. Thoroughly test this type of coupon to be sure it works as you
understand it to work. Can only be used in stores using the MySQL database.
You can assign a coupon to remove the shipping charge. It has no specific value (using 0 for the
value is fine) as it will eliminate the shipping charge no matter how much it is. You can also
have free shipping AND a percentage discount or free shipping AND a flat value off.
The discount is calculated the same as fixed discount or percentage discount, depending on which
you use. The label you enter under the admin tab will display on the invoice for the free
shipping line item, e.g. Free Ground Shipping. Only the free shipping option can be used with
Google checkout because of the way the Google module works, i.e. you can't use the dual use coupons
if using Google Checkout. Beginning with version 5.052 new features have been added for these three
types. You can assign a label for each one that shows in the basket and describes the specific
coupon, e.g. Free 2-day Air, instead of using the default. All three of these can be redeemed on the
basket page if you are using that input feature. If you do that, the coupon will appear in the drop
down of shipping methods. If you redeem on the OSEL page, it will function as it has in the past
(see above). The free coupon can actually have a value so it can be "reduced" shipping vs free
shipping. So you could have something like $3.00 2-day Air. Just set the coupon value to an
amount rather than 0.00. With the dual use coupons though, the shipping will always be free because
the "value" field is used to set the discount from the products total. Familiarize yourself with this
feature before you implement it.
Beginning with coupon module 5.028 and cim activity log 5.013 you can have discounted shipping.
For example, if you put 50 in the coupon value and select Percent Discount Off Shipping, the
shipping charge selected by the customer will be discounted by 50%. If you select Fixed
Discount Off Shipping it will discount a fixed amount, e.g. $2.00 off the shipping charge.
Both of these discounts will show as a separate line item. So the customer will see the
shipping method and regular charge they selected and then another line item with the discount
amount in parenthesis, indicating a negative charge. The label you enter under the admin tab
will display on the invoice for the discounted shipping line item, e.g. Promotional Shipping.
This coupon type cannot be used with Google checkout. It can only be used as a checkout coupon
on the OSEL page.
Beginning with coupon module 5.028 and cim activity log 5.018 you can provide free shipping for
specific products in the order. Other products will be charged shipping as if the free shipping
products did not exist in the order. This feature should work with most shipping modules that follow
the Miva Merchant API. You'll need to test it in your store. It cannot be used with the address
supermod module. The customer chooses the shipping method they want to use and enter the coupon
code, then click continue. The module checks the basket and if there are free shipping products in it, it
retrieves from the installed shipping modules the cost with and without those products. If that means there are no
products to charge shipping on or the shipping module is configured such that it doesn't charge for
the remaining products, the module inserts the free shipping line item that you have already configured
for the store. To use this option select Prorated Shipping. The value can be 0. Enter the product codes
to be exempted followed by the | character after each. This
coupon may not be a separate line item in the basket in all cases. Sometimes the chosen shipping line
item will simply be discounted. Most times you will see the chosen shipping line item and a coupon line
item with the calculated discount (difference between with and without the free ship products). Normally, it
will cause a lower shipping cost. In some cases it may not even do that, e.g. the cost is the same
between 1-2 pounds and the free shipping product caused the basket to go from 1.9 to 1.5 pounds, there
would be no change in shipping cost. Also, this coupon may not limited by the number of times it can be
used. Since it may not be recorded as a line item, there may be no history to check to see if it has already
been used. You'll need to test in your store with the installed shipping modules to see how the coupon
effects the shipping charges and whether it is a separate discount line item. This coupon type cannot be used
with Google checkout. It can only be used as a checkout coupon on the OSEL page. If you have coupon module
5.028 or newer but your cim activity log is older than 5.018 you can get a free updated cim activity log at the
Request Form.
You will need Coupon Redemption module version 5.041 or newer to use this coupon type.
This type cannot be used in the checkout/shipping coupon input because you don't want to add free items after
shipping and payment methods have been selected. It also cannot be used in the input for instant coupons. However,
it can be used in the basket screen or any other page by using the coupon input form listed below under "Customer Interface".
This type can be a free product coupon; e.g. buy X and get Y free. To configure this you would put 100 in the
value input and the qualifying (X) product codes followed by the free product (Y) code in the eligible products
input. The free product code
is prefaced with the # character. So in the eligible products input you might have ABC|MNO|#XYZ| This setting would
make the coupon valid if either ABC or MNO product codes were in the basket. Then if the coupon was redeemed in the
basket screen, the XYZ product would be added to the basket and a separate line item with the coupon equal to the XYZ
price would be included. If the item is already in your basket, it simply adds the coupon line
item. If you delete the qualifying products, the coupon will be removed but the product will remain. So customers
cannot cheat the store. If you try to remove the free product it won't let you unless you clear the whole basket or
you remove the qualifying products first. There is also a variation of this type coupon. Buy 2 get 1 free or discounted.
It does not require any specific qualifying product. Instead it requires multiples
(that you specify) of the discount product. For example, #XYZ:2| could be put in the eligible product codes input. In
the value input you could put 50. The configuration of this example is if you have 2 or more of the XYZ item in
the basket, the second will be 50% off (i.e. buy 1 get the 2nd half off). If you have less than 2 in the basket, it will
add to the quantity to make the coupon valid if you redeem it. It could just as easily be buy 4 of the specific product
and get 1 of that same product free. You set the rules for the coupon. As you can see, this coupon is great for running
short specials. The same rules can apply as a typical checkout coupon except it will not be limited by location since
it is usually redeemed before they go to checkout. It also could result in customers getting too much discount. So
if you make a free or reduced coupon and also have a percent off entire order coupon, you would want to exclude the
free/reduced product codes from the entire order coupon list. See "Eligible Products" section below. The free product
cannot have attributes and options if it needs to be added to the basket. If it is already in the basket you could use
this type coupon as long as the attributes/options do not change the price and the price is based on the base product price.
So if they first add product X AND Y to the basket, they then can apply the coupon using X|#Y| as the eligible products.
You cannot use this if the item is the same product with different attributes, e.g. #X:2| would not work if the attributes
were different as it would try to add another to the basket. It will also not work if you used X|#X| as they could cheat
you out of free products. This is a new coupon type and we have tested it under many conditions. But before you use this
coupon type, you need to thoroughly test your scenario to be sure it is giving the discount you intend it to give and
no more. This coupon type cannot be used with Google checkout.
This coupon can only be used in the basket screen. If the customer has two of the eligible item in their basket and
they redeem this coupon, it will create a negative cost attribute to subtract the value of one item. The default is
buy 1 and get the other free. Set the coupon value to be 100. You can actually modify the default discount using the
tiers input. For example #3=1 would be with 3 in the basket, the value of 1 of them would be subtracted. The attribute
discount coupons will not always be exactly the correct amount off. Because the attribute price database is only 2
decimals, when multiplied by the number in the basket, it may round up or down a cent or two. You'll need to study
this affect before you decide to use this coupon type. This coupon type can only be used in MySQL stores.
This subtracts the value you set from the order total. For example, if the value is 5.00, it will
subtract $5.00 off the order total. All products listed in the eligible products input must be in
the basket before the coupon can be redeemed. It can be used as a checkout or basket coupon, but not
an instant coupon. You cannot use the wildcard for product codes. You cannot use the exclude option
for product codes. You cannot limit to a specific attribute/option of a product. This coupon type
cannot be used at Google. If one of the
qualifying products is removed from the basket, the coupon will also be removed from the basket.
You will need coupon module version 5.046 or newer to use this coupon type.
This multiplies the subtotal of the order times the percent discount and subtracts it from the order
total. For example, if the value is 10.00, it will multiply .10 times the order subtotal, then
subtract that amount from the order total. The order subtotal can be the sum of all the product prices
or it can be the sum of just some of the product prices. See the eligible products paragraph below for
more details. All products listed in the eligible products input must be in
the basket before the coupon can be redeemed. It can be used as a checkout or basket coupon, but not
an instant coupon. You cannot use the wildcard for product codes. You cannot use the exclude option
for product codes. You cannot limit to a specific attribute/option of a product. This coupon type
cannot be used at Google. If one of the
qualifying products is removed from the basket, the coupon will also be removed from the basket.
You will need coupon module version 5.046 or newer to use this coupon type.
The module looks at every product in the basket. It finds the highest priced item and applies the
specified percent off that product as the discount. It can be used as a checkout or basket coupon, but not
an instant coupon. You will need coupon module version 5.053 or newer to use this coupon type. Note:
Do not check the box "Apply % Discount Only to the Above" because the discount is applied to just the highest
priced item, which does not need to be in the list of eligible products. If you check that box it overrides
your intent and applies the discount to all the products in the list.
The module looks at every product in the basket. It finds the lowest priced item and applies the
specified percent off that product as the discount. It can be used as a checkout or basket coupon, but not
an instant coupon. You will need coupon module version 5.062 or newer to use this coupon type. This coupon
is usually used in conjunction with the tiers override. For example, in the tiers input you might have
#4=100|1=0 That deal would be buy 4 items and the lowest price would be 100% off (free). You can limit the
qualifying counting to a specific category or list of products by using the $ character at the end of the
string (see Order Minimum section). However, the lowest priced item may be from other than the eligible
products list since all products in the basket are eligible for this discount if they are the lowest price
in the basket. Note: Do not check the box "Apply % Discount Only to the Above" because the discount is
applied to just the lowest priced item, which does not need to be in the list of eligible products. If
you check that box it overrides your intent and applies the discount to all the products in the list.
A flat value OR percentage off the order total is assigned to each coupon. The default is flat value,
eg $5.00 off the order total. If you select the percent off type, it will calculate the coupon value
based on the assigned percent of the order total. Note: only include numbers or decimal in the value
field. The %, if used, is selected from the type input. See the section "Eligible Products" below about
restricting calculations to specific products.
Beginning with coupon module version 5.056, you can vary the value of the coupon based on the products
subtotal. This input, when used, overrides the value setting if a tier level is met. You must still put a value
in the value input. The subtotal can be the sum of all the products in the basket or just specified eligible
products. See the use of the "$" in the "Order Minimum" discussion below to limit the subtotal to just the eligible
products. The subtotal can then be used to meet the order minimum requirement (discussed below) and the tiers
for the sliding discount values. The highest tier is first, with lower tiers descending to the right.
Example: 100=20|50=15|25=12. The subtotal is to the left of the = and the coupon value to the right. So in
this example, if the subtotal is $51.95, the discount would be 15. If the coupon type is fixed discount, that
15 would be $15 off the order. If the coupon type is percent discount it would be 15% off the subtotal. The
subtotal would be either the full order or just the eligible products, depending on if you check the box to
apply the % discount to only eligible products.
Beginning with coupon module version 5.061, I added "number of products" to the tiers feature. So instead of
changing the discount based on the subtotal, it changes based on the number of items in the order or just the
number of eligible items. You can even set the value to 0 above and below a certain number. For example, I setup
a coupon with the value of 1 cent. But in the tiers input I override that completely with #3=0|2=66.66666|1=0. In
the eligible products input I put 1AA90205|$ The result is that the only product counted is 1AA90205. It could have
been configured to use a category code instead of individual product codes. If I leave off the $ it would be all
products in the basket. If you have 1 or 3 of them in the basket, the discount is $0.00. But if you have 2 in the
basket, the discount is 66.66666% off. If I had made 3=75, then it would compute
75% off if 3 or more are in the basket, 66.66666% if 2, and $0.00 if 1. The discount value can be a fixed amount
instead of a percent off if you change the coupon type to fixed. The coupon can be redeemed either at checkout
or in the basket if you have setup basket coupons. An added benefit is you can have a coupon that has no value.
I don't know why they wanted it, but some have asked for that feature in the past.
Most coupons will have the optional tiers input blank, as this is not a common coupon usage.
This field can be left 0 for fixed discount coupons as they will not be redeemed for more than the fixed
amount. However, with percentage discount coupons you may want to limit the discount amount off the order
total. If you do, enter the value in this input. If left at 0, there is no maxiumum.
Optionally, a coupon can be allowed only when an order total reaches a
specific amount. In all cases where a fixed discount type is used, you must make
this value equal to or greater than the value of the coupon. If you use
the percent calculation, this value can be any value, including zero. Beginning with coupon
module version 5.0500 a variation of this
feature is to only allow the coupon when the sum of the specified eligible products
exceed the specific amount. For instance, you make a coupon valid if either or both product
A and product B are ordered. In the eligible product input you would put A|B| However, if
you wanted it to only be valid if the dollar value of A and/or B exceeded $100 and 1 or more of A or B
were ordered, you would put 100 in the order minimum input and A|B|$ in the eligible products
input. The $ after the last | character tells the module that the minimum sum must come from
the eligible products. This feature can be used by all coupon types except the free/discounted
product where you specify a code and the number to be bought in order to get the coupon discount.
Since you are specifying the number to buy, the dollar value of the eligible products is not
a factor.
Beginning with version 5.054 you can include an optional start date. It will prevent its use
prior to the start date. Enter it in the international date format, i.e. year, month, and day (YYYYMMDD).
For example, 20000724 would be July 24, 2000. If you leave this field blank the
coupon will be available for use the moment you create it.
An optional expiration date can be included which will prevent its use
if the date has passed. Enter it in the international date format, i.e. year, month, and day (YYYYMMDD).
For example, 20000724 would be July 24, 2000. If you leave this field blank the
coupon will never expire. However, you can still delete it manually
through the admin interface. Also, if you are creating coupon templates (which permit auto-generation
of unique coupons) this value will be not be an actual date. See the Coupon Code Generator section
for more details on that exception.
Based on your state's tax requirements, the coupon can be designated to
reduce the sales tax or not reduce it. For example, in some states, a
store coupon reduces the value of products purchased before the sales tax
is applied, hence you would want it to reduce tax. The exception to doing
this is if your products are likely to be non-taxable, making a coupon
reduce tax could result in a negative tax calculation. Another type
coupon might be the manufacturer coupon. In some states, manufacturer
coupons do not decrease the tax liability. You should determine your
state's tax requirements before adding coupons to your store.
- multiple times - The coupon can be used at every visit by any customer
who shops at your store. This is usually used as a promo to customers,
user lists, clubs, etc. They often have a short expiration date to limit
their use. A typical usage might be a special holiday sale, eg 10% off
everything in the store if used by a specified date. This would eliminate
the need for special price groups if the intent is that everybody who has
the coupon code can use it. Just
below the selection for usage, there is an input for the number of
times the specific multiple coupon can be used. When an order is completed,
the coupon becomes used. It is possible that the usage limit can be exceeded
if a customer puts one of them in their basket during checkout while there is
still one remaining. But before their order completes, someone else completes
an order who also had the last one in their basket. This is a limitation
you should be aware of when deciding how you will use the limit feature of
multiple times coupons.
- only one time for each customer - The coupon can only be used for one
visit per customer. When the same customer shops at your store a second
time, if he/she uses the same coupon code, it will be rejected. This is
probably the most common coupon and is usually used in print ads or as
a promo, e.g. "$5.00 off on your next visit". Note: This type cannot be
used with Google Checkout since the Google module does not supply the customer info
back to the coupon module when redeeming coupons. It also can only be used as
a checkout page coupon since the identity has to be known of the person who is using
the coupon.
- only one time for a unique coupon code - The coupon can only be used
once. Once any customer has used this code, it becomes unavailable for
any other purchase. This is often used as a customer relations tool, e.g.
"sorry for the inconvenience, please accept this coupon.....".
You can restrict usage of a coupon in your store so that it can be used
only if a specific product code is ordered. You can list several product codes,
any of which in the basket would make the coupon valid if the other
requirements are met. IMPORTANT: After each product code, put the | character at the end of the
product code. Caution: do not put the same product code in the
list more than one time. Leaving the product code blank means that customers
do not have to order a specific product as long as they meet the other
requirements the store owner has specified. If you check the "Apply % Discount Only to the Above" box
just below the product code input, and are using the percentage discount,
only those products in the product code list will be used in the calculation. If
you do not check the box, the percentage will be applied against the
order total. You can use an asterisk to create a wildcard of product codes.
It only works with the first few letters of the product codes. So if you
enter 1AA*| as the input, all product codes which BEGIN with 1AA will be
eligible. The coupon module has the ability
to restrict the coupon usage down to the attribute level. For example,
you can limit the coupon to product codes beginning with
1AA and the attribute "Version" with the option of "4.5". The
format for the input would be 1AA*~Version~4.5| You can also create a coupon
that can be used for all items except those specified in a list. For
excluding, put the minus character at the very beginning of the list. Example:
-ABC|XYZ|NOP| would exclude those three products from activating the coupon. Do not
put the minus character for each; only put it at the beginning.
You cannot use excluded coupons down to the attribute level. Keep in mind when
excluding products that if any product in the basket is not in the exclude list, the coupon
will be valid.
- Category Coupons - Beginning with Coupon Redemption module version 5.043 you can
put the category codes in the eligible products input. You cannot use the asterisk, nor can you
restrict to the attribute level. But you can list all the category codes you want to use. If a
product in the basket is in one of the categories listed and the other restrictions are met, the
coupon can be used. If not, the customer will get the typical message that the coupon cannot be
used for the products in the basket. To use category codes instead of product codes in this input,
begin the line with the tilde character, then follow with the codes. Terminate each code with the
pipe character. So a line like ~BOOKS|TAPES| would allow the coupon for products that are in the
books and tapes categories. This coupon can be used with all coupon types except the prorated
shipping.
- Custom Product Field Coupons - Beginning with Coupon Redemption module
version 5.066 you can put one custom field and its eligible value in the eligible products input. This
would be useful if you wanted to put one manufacturer's products on sale. If you had a custom field,
e.g. and it had the names of the manufacturers in that field, you could isolate one manufacturer's
products to be eligible for a coupon. Instead of product or category codes you would put a token in the
form of @fieldcode=fieldvalue| As example, @manuf=ACME| would be valid for all of the ACME products. This
particular option has a reverse feature. So if you put @manuf!=ACME| in the input, all products in the
store except ACME's would be eligible.
If you check the input "Instant Coupons", the coupon can only be used on the
individual product screen. More than one instant coupon can be redeemed in a single
order. Because they are redeemed at the product screen (before checkout),
they do not have the restrictions on order subtotal or order location nor
can they be used for free shipping.
Thus, don't create a fixed amount $5 coupon for a $4 product. Always
make sure the value of instant coupons are appropriate to the product
you are assigning them to. Instant coupons must have one or more products it
can be used for listed in the input for "Eligible Products" in order
to calculate a discount. Percentage off coupons are more appropriate
when you are allowing the instant coupon to be redeemed with more than one
product code. Likewise, they are not limited to the multiple coupon
limitation number within a single order because the multiple usage is
not recorded until the order it completed. You need to consider that
these coupons will provide additional discount for multiple quantities
of eligible products. They also cannot restrict to one per customer because
they are redeemed before the customer even logs in. If you do not want to
use the instant coupons, erase the admin input for Instant Coupon Prompt.
Instant coupons are particularly useful if you want to send out a link in
an email with the product code and coupon code in the link so the customer
can click the link and it puts the product and coupon in the basket
automatically.
Coupon Insertion Example
You can alternatively use a form, for example:
Beginning with version 5.0500, you can restrict the ability to use specific coupon codes based on
price group membership. This restriction can be used with checkout, basket and Google checkout
coupons. It cannot be used with instant coupons which are redeemed on the product page. You can
make a coupon only valid for only those in specified price groups. Alternatively, you could restrict
a coupon from being used by specified price group members. Keep in mind though, a price group customer
could use a coupon they are not supposed to use if they redeem it in the basket after adding a product
and before logging in. So if you are allowing basket redeemed coupons, you should not create coupons
which do not allow price group customers to use them. If that is the case, only use checkout coupons
in your store. To allow by price group, in the input list the price group names separated with the |
character. If you want to exclude a coupon from use by specific price groups, begin the line with a minus
character, followed by the price group names (e.g. -Wholesale|Premium|Gold).
Beginning with version 5.0520, you can have a separate label (optional) for each coupon which describes
the coupon in the customer's basket. If you leave this input blank, the module will use the default
description located in the "Admin" tab of the coupon redemption module.
You can limit the usage of a coupon to a specific area/zone. Begin the input
with ONE of these: SC- SS- SZ- BC- BS- BZ- The first letter indicates the
ship to (S) or bill to (B) address to be compared to the restriction list.
The next letter indicates the scope of the zone: country (C), state (S), or
ZIP code (Z). Then follow that with a hyphen. After that you would put in
the eligible location codes separated with the | as a delimiter. Thus, if
you put SC- at the beginning, you might continue the input with US|CA|MX to
result in SC-US|CA|MX This would indicate that a coupon can only be used
if the ship to country is either United States, Canada, or Mexico. There
is a special code if you want to limit it to the United States but exclude
Alaska and Hawaii. Use the code USX for this special condition. If you
use state limiting, the state codes used may be the same as state codes in
a different country. The ZIP code match is for 5 digit ZIP codes. Most
likely you will only use the location feature for the country comparison and
free shipping coupons. You may not want to provide a coupon for free
shipping for customers outside of your native country. I've included the
state and ZIP in case you might want to have some local area specials.
Beginning with coupon module version 5.013 you can redeem coupons
in conjunction with the Google checkout module for Miva Merchant 5.x. You
can use the fixed discount or percent discount or free shipping type coupons.
Bug alert: In some versions of the Google checkout module the free
shipping is getting doubled. Miva had fixed their Google module but then it
broke again. You need to keep a close eye on this if you use free shipping and
are using Google checkout. While it might be working at one time, an update of
the Google module may break it again.
Note if you use the free shipping coupon, Google will make whatever shipping
method the customer selects free. If you are using the CBS Shipping Supermod, the
free shipping coupon will also make whatever shipping method the customer chooses free.
The coupon code will not be included in the CBS shipping method line item. For this
reason you may not want to use the free shipping coupon if you are also using the
CBS Shipping Supermod.
You can quickly find a specific coupon by entering the first few letters of it or the full coupon
code and clicking the Go button. When you select the first few letters you can display all the coupons
that are similar, e.g. all those that begin with "WELCOME". Also, there is a quick find for all
sub-coupons (those coupons that are auto-generated from coupon templates). If the coupon is a template
(its code begins with #) and the ~ character preceeds the prepend text (e.g. #6~FLW-), the coupon code will
be shown with a hyperlink. Simply click the coupon template code in the list of coupons. For more info
about template coupons see the paragraph below "Coupon Code Generator".
Expired or cancelled coupons can be removed from the database (to cut down on disk
usage) one at a time or in mass. In admin, you can either put a check
in the remove column and select update or select purge expired coupons,
then select update.
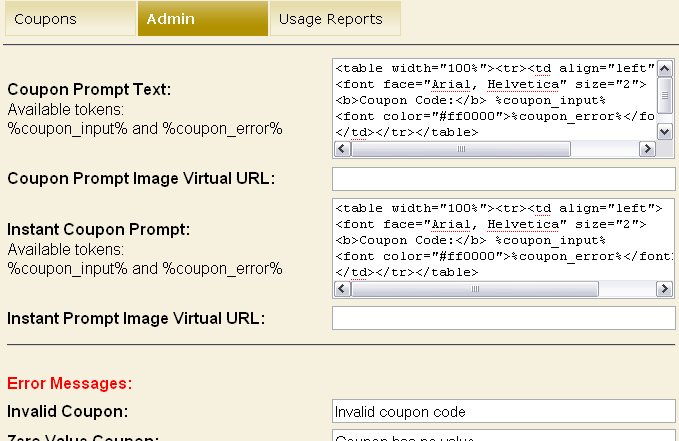
This is the label (prompt) the customer sees on the shipping/payment selection page. The default is
quite simple. You can replace this default with template code that lets you style the prompt and input.
If you do replace the default, you must include both tokens, %coupon_input% and %coupon_error%, in the
template text. As a simple replacement, here is an example.
<table width="300">
<tr>
<td align="left">
<font face="Arial, Helvetica" size="2">
<B>Coupon Code:</B> %coupon_input%
<font color="#ff0000">
%coupon_error%
</font>
</font>
</td>
</tr>
</table>
You can use an image for the label (prompt) instead of text. If you leave this blank, the module will use the
text you used in the above box.
This is the label (prompt) the customer sees on the product page. The default is
quite simple. You can replace this default with template code that lets you style the prompt and input.
If you do replace the default, you must include both tokens, %coupon_input% and %coupon_error%, in the
template text. See the example above.
You can use an image for the label (prompt) instead of text. If you leave this blank, the module will use the
text you used in the above box.
The error messages are self explanatory. They relate to the restrictions that were covered in the descriptions
of the coupon inputs above.
Beginning with version 5.035, you can set the maximum number of coupons that can be
redeemed in a single order. When they try to add a coupon past that number, a configurable
message will display and the coupon will not be added. You can also display a convenient
tally of the number and value of the coupons that are currently in the basket with this code.
<mvt:item name="couponrd" param="current" />
<mvt:if expr="l.settings:couponrd:limit:count GT 0">
<font size="-2">
<mvt:if expr="l.settings:couponrd:limit:reached GT 0">
<font color="red">
<mvt:else>
<font color="#000000">
</mvt:if>
Redeemed: &mvte:couponrd:limit:count;
</font>
Value: &mvte:couponrd:limit:formatted_discount;
</font>
</mvt:if>
The coupons become line items in the basket. The coupons redeemed during checkout or in the basket will
have the label defined by the "Coupon Display Label" input. An exception to this is the free shipping coupon.
Its label is defined by the "Free Shipping Label" input. The instant coupon, defined by "Instant Coupon Label"
can also have a token that displays the product code it was used for in the line item. The token is
%product_code%.
If you insert the token (editing requirements below) on the PROD page template, the instant coupon prompt
will show on all product pages. If that is what you want, leave this input blank. However, if you only want
it to show on certain product pages, you will enter those product codes in this input. Separate each with
product code with a | character. Since you may have many products that this applies to, we have included an
Auto-fill feature. Check auto-fill box and click update to fill the input with eligible products. Do not
use auto-fill if any instant coupons either have a wildcard (*) or do not have product codes specified in the
list of eligible product codes. After clicking update you should see the input fill up with eligible products
and the auto-fill box will uncheck itself. Remember, you cannot use the wildcard (*) in this input.
If you don't want price group customers to see the coupon prompts, you can check the box. Since they
already get hefty discounts you may not want them to see coupon prompts. Keep in mind, if they are not logged
in and you are using instant coupons, they will not be restricted by this as the system does not know they
are a price group customer. Also, if you are redeeming coupons on the basket page or pages other than
checkout, they will not be restricted.
You can limit the coupon restriction to just some price groups. In the input, list the price groups.
Separate each price group name with the | character. Keep in mind, if they are not logged
in and you are using instant coupons, they will not be restricted by this as the system does not know they
are a price group customer. Also, if you are redeeming coupons on the basket page or pages other than
checkout, they will not be restricted.
The module is called within specific template screens with render tokens. They are in the format of
<mvt:item name="itemcode" param="xxxx" />
The templates are listed at the Pages link in admin. You will edit the template by inserting the token and clicking the Update (fig 7). Important: After adding the render token to a template page, you must click the Items link for that page, scroll down to the item name and assign it to the page (fig 8). These two steps are repeated for every page that a module's render token is used on.
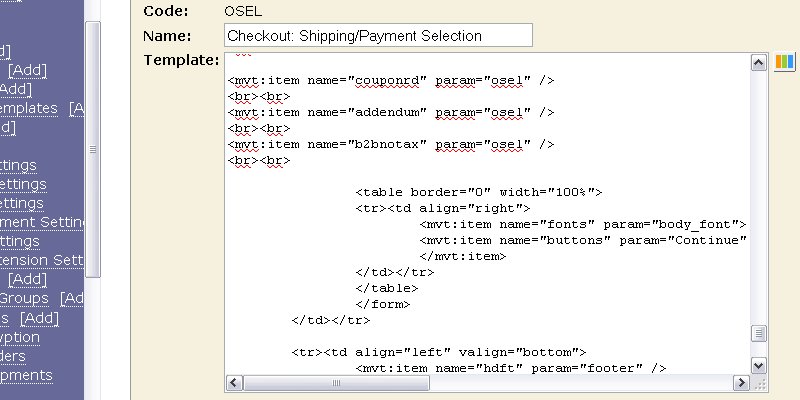
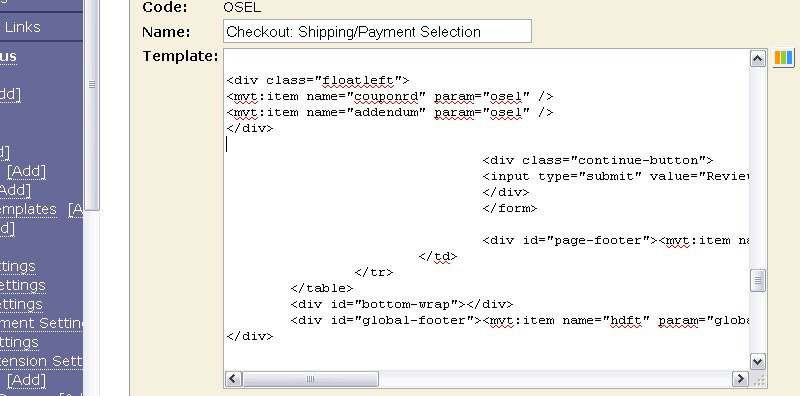
1) On page 'OSEL' (shipping/payment selection), insert
<mvt:item name="couponrd" param="osel" />
just above the continue button code and the closing </form> tag (fig 7).
2) On page 'OPAY' (order payment), insert
<mvt:item name="couponrd" param="opay" />
just above the continue button code and the closing </form> tag.
3) If you are going to use "instant coupons", on page 'PROD' (product display), click the tab at the top labeled Product Display Layout. Then near the bottom, if the template code is not exposed, click the link for Advanced Mode. Insert
<mvt:item name="couponrd" param="prod" />
on the page. You may insert it within an existing table cell or create a new table row with cell(s), e.g. wrap the token with <tr> <td> (token here) </td> </tr> This token has to be within the existing add to basket form on that page. Most put it just above the quantity input.
4) On page PATR, if your products have attributes and you are going to use the instant (product page) coupons, you will need to add a hidden input to the 'PATR' missing product attribute page template within the form with the other hidden inputs. The input lines to add are
<mvt:if expr="g.coupon_id45">
<input type="hidden" name="coupon_id45" value="&mvte:global:coupon_id45;">
</mvt:if>
If you also have the Emporium Plus Tool Kit assigned in the store, at the very top line of the PATR page, insert this code
<mvt:if expr="g.Action EQ 'RPRD'">
<mvt:item name="toolkit" param="sassign|Action|" />
<mvt:item name="toolkit" param="render|BASK" />
</mvt:if>
Coupon codes are entered at the checkout screen which also displays the shipping and payment selections. Appropriate error messages are displayed when coupons do not meet the usage criteria established by the store owner. When the shopper enters a coupon code at checkout that is not valid based on the criteria you establish, he/she will see an error message just below the coupon code input when the checkout form is re-displayed after the validation step. Customers are allowed to redeem one "checkout" coupon per order.
Additionally, if customers go back to the basket and remove items which previously qualified them for a coupon, then go to checkout, they will not be able to get past the coupon validation step with a coupon not meeting the pre-established criteria.
You can use a free product coupon (version 5.041 or newer) to function as an upsell; i.e. buy product X and get product Y free or at reduced price. Create a new coupon. In this example we will offer product code 1AA00223 half off if the customer puts the 1AA00110 in their basket first. The coupon will have 50 for its value. In the eligible product input are the codes 1AA00110|#1AA00223| The first line in this example is a line already on the PROD page in the product display layout tab. The rest of the lines are added to create the form with a button to put the upsell product in the basket along with its coupon. Course you'll change the product codes in the coupon setup and the form code below.
Quantity in Basket: &mvt:product:quantity;
<mvt:if expr="l.settings:product:code EQ '1AA00110'">
<mvt:item name="toolkit" param="sassign|upsell_code|1AA00223" />
<mvt:item name="toolkit" param="vproduct_find|productfound|g.upsell_code" />
<mvt:item name="toolkit" param="sassign|half|.5" />
<mvt:item name="toolkit" param="math_multiply|half_price|l.all_settings:key_product:adjusted_price|half" />
<mvt:item name="toolkit" param="currencyformat|formatted_half_price|g.half_price" />
<form method="post" action="&mvt:global:sessionurl;">
<input type="hidden" name="Store_Code" value="&mvte:global:Store_Code;">
<input type="hidden" name="Screen" value="BASK">
<input type="hidden" name="Action" value="NEW">
<input type="hidden" name="SubScreen" value="CouponRd">
<input type="hidden" name="Product_Code" value="1AA00223">
<input type="hidden" name="Category_Code" value="&mvte:global:Category_Code;">
<input type="hidden" name="Offset" value="&mvte:global:Offset;">
<input type="hidden" name="coupon_id55" value="UPSELLTK">
<input type="submit" name="cpn" value="Add Tool Kit - &mvte:global:formatted_half_price;">
<font color="red" size="-1">
</font>
</form>
</mvt:if>
Beginning with Coupon module version 5.058 we have added a special coupon which can calculate a discount based on the number of points the customer has accumulated in their coupon points account. Essentially the system works like a coupon, but allows carry over of points.
Since this is a coupon, it uses the same rules which exist for other coupons. You can make the coupon valid based on many factors; minimum order total, certain products, include/exclude price groups, location in the world, or payment method used. That said, customers feel entitled to those points, so you probably won't put too many restrictions on them. You can set a maximum redemption value on a single order. If the points available for redemption exceeds the total of the order, points are carried over. You can also configure the system to only redeem off the product total. However, you can configure it to consider other discounts (coupons, etc) or fees, shipping and tax when calculating the order total it can subtract from. So you can make it so points can zero out an order or you can make it so the customer pays shipping and tax.
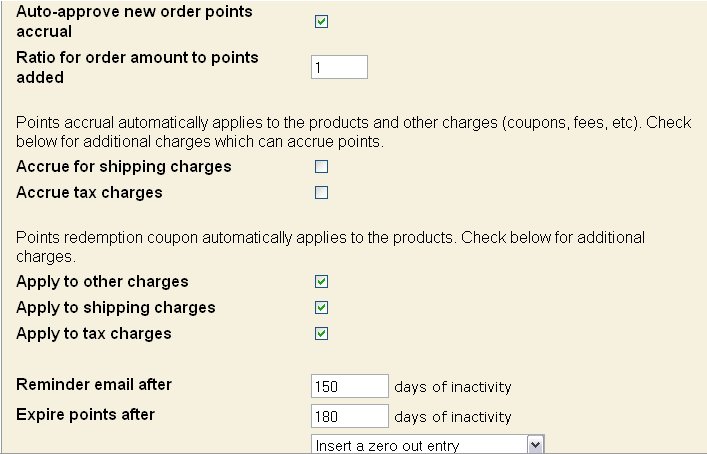
You can configure the module so that points are saved to the account when the customer completes an order or other action. You can make the points immediately available by checking the box to auto-activate the points. The points can be 1 for 1, e.g. if an order is $147.50, 148 points are deposited in the account. You can limit the order total used in the calculation to just the products and other charges (coupons, fees, etc) or you can include shipping and/or tax in the total too. Or you can save points as a ratio of an amount, e.g. save as 1 point for every $10 spent. Your choice. When the points are redeemed you can do the same thing, i.e. 1 for 1 or 1 for X. Again, your choice. I found the clearest method for the customer is to save 1 for 1, then redeem at $1 for 10 points. Essentially they are getting 10% off their previous order which is given to them on the next order. This stimulates customer loyalty and increases the chance they will return to collect the virtual money they left on the table.
Customers can view their award point transactions in the Account tab after they login. Since the display the customer sees is done with store morph template code, you can show or hide any of the columns of data. You can also change the date format to match that of the majority of your customers, e.g. MM/DD/YYYY, DD/MM/YYYY, or YYYYMMDD.
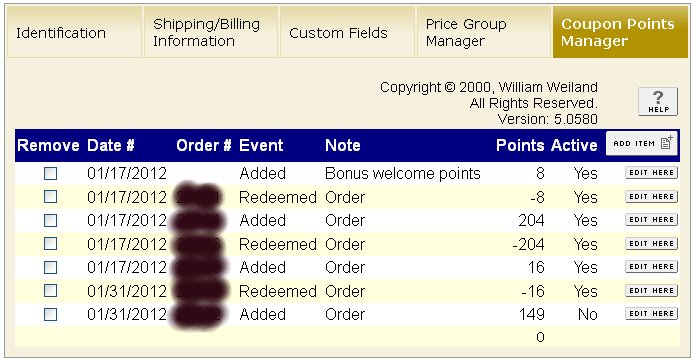
Store owners can view a customer's points transactions in admin (fig 12). If you do not have auto-activate turned on, you can check the box to activate the points in the admin screen. Store owners can also edit transactions to change points in case there was a change in the order. The store owner can also delete transactions from the account. The store owner can insert a points transaction, e.g. to compensate for a problem with an order. However, do not sell points as that would be more like a gift certificate which has a different legal status than a coupon.
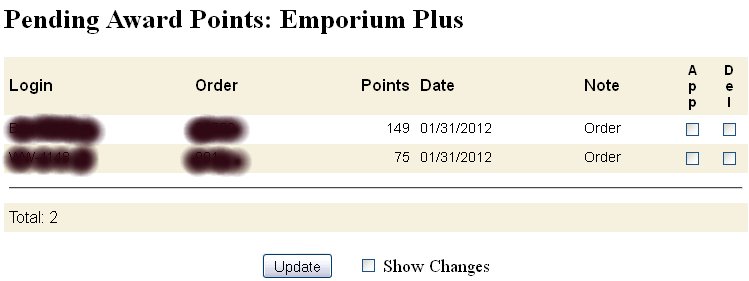
There is a quick update screen for pending points approval. On that screen it lists all points transactions that are pending. You can approve the transactions or delete them by checking the applicable boxes in the transaction list and click the update button at the bottom of the page.
The module has both an import and export capability. Fields in the import/export include customer login, order id (if applicable), date in unix time, event (add, subtract, modify, etc.), note (welcome, order related, compenstion, etc.), and points.
Getting Started:
- To get started create the coupon. This example is for 1 for 1 points creation and .1 for 1 redemption. Add a new coupon with the coupon code POINTS. Select Percent Discount for the type. Set the amount to 10.00 (which is 10%, i.e. .1 for 1). Set a Maximum Value if you want to limit to a certain amount in a single order. Do not set start or end dates. Make it a multiple use coupon. Set the Alternate Basket Label, e.g. Award Points or whatever you want to call your program. Save the new coupon.
- Click the Admin tab in the Coupon Redemption screen. Scroll to the bottom (fig 13). You have the option to
make points available immediately with the auto-activate check box. Or you an make them pending until you
change the status to active in admin. Set the ratio for order
amount to points added. If you are giving 1 point for each dollar spent, the number would be 1. If 1/2 point
for each dollar spent, the number would be .5. When determining how many points can be redeemed in an order, the
limit will be at least the cost of the products. If you offer coupons or other discounts you would want to
include those "other" charges. As example, an order is $10. A coupon for $1 off is redeemed. That means their
balance is $9. If you only considered the products, the points redemption could be $10 which means you would
owe them a dollar. So you normally apply to the "other" charges too. As for tax and shipping, if you want
points to subtract from that so that you can get a zero dollar order, you would check those two boxes. Many
points systems expire points if they are not used and an account remains dormant for a period of time. If you
do that, you probably should notify customers that their points coupon is about to expire. You can send them
and email X number of days from the date of their last activity. Likewise, you can expire those points at
some time after that last activity. When you expire you have options on what message, if any, you want to
display in the customer's history panel (limited to 50 characters long). Once configured, you will be able to
run the email reminders and expired account adjustment by clicking the + to the left of Utilities. Then click
on the Coupon Utility link. You will see the forms for those two tasks. You could also setup cron tasks to
handle these operations automatically. An example cron command for sending the reminder emails that I use is:
wget --post-data='Screen=SUTL&Action=SUTL&Store_Code=YOURSTORECODE&Module_Code=couponrp&UserName=YOURUSERNAME&Password=YOURPASSWORD&Provision=yes&Submit=Login&subaction=reminders' https://www.YOURDOMAIN.com/mm5/admin.mvc --no-check-certificate >/dev/null 2>&1
An example cron command for adjusting dormant accounts that I use is:
wget --post-data='Screen=SUTL&Action=SUTL&Store_Code=YOURSTORECODE&Module_Code=couponrp&UserName=YOURUSERNAME&Password=YOURPASSWORD&Provision=yes&Submit=Login&subaction=remove' https://www.YOURDOMAIN.com/mm5/admin.mvc --no-check-certificate >/dev/null 2>&1
Change the words in upper case to the actual values for your store. - If you opt to send the reminder emails, you will need to create a page template called POINTS_E. Here is
an example to help get you started.
<mvt:if expr="g.Screen CIN 'POINTS_E'">
<mvt:exit>
</mvt:if>
%subject|EmporiumPlus.com - Reward Points Program%
%to|bill_email%
<html>
<head>
<base href="&mvt:global:basehref;">
</head>
<body>
<mvt:item name="fonts" param="body_font">
Dear &mvte:global:CustomerPoints:bill_fname; &mvte:global:CustomerPoints:bill_lname;,
<br><br>
We noticed you have not added or redeemed points in our store since &mvte:global:CustomerPoints:mm;/&mvte:global:CustomerPoints:dd;/&mvte:global:CustomerPoints:yyyy;. We just wanted to remind you that you have &mvte:global:CustomerPoints:balance; points in your account which are set to expire in approximately 30 days. To avoid losing these points, you can redeem the points or make a purchase, no matter how small it is, to keep your account active. %lf%
<br><br>
YOUR NAME HERE
<br>
Store Owner
<br>
<a href="http://www.YOURDOMAIN.com/mm5/merchant.mvc">&mvt:global:store:name;</a>
</mvt:item>
%lf%
</body>
</html>
Beginning with couponrp version 5.014 you can also change the from address block with tokens, e.g.
%from|abc@yourdomain.com%
%from_name|YOUR STORE NAME%
To use the from_name token you will need to have "Add Angle Brackets to Email Addresses" turned on in your global settings:domain settings:site configuration if your mail server supports them.
Some mail servers, e.g. the new ones at mivamerchant.com are not supporting the from NAME address. So we added a new token in version 5.017 of the coupon utility module to handle those servers. Use this for the from name address token instead of the one above.
%from|abc@yourdomain.com%
%from_namens|YOUR STORE NAME%
Email opt out option
You will need Emporium Plus Tool Kit version 5.270 or newer and Coupon Utility version 5.019 or newer in order to implement this feature. The Tool Kit maintains a registry of customers who have told you they only want order emails from you. First setup the Tool Kit functionality. See the functions "donotemail_e" and "donotemail" in the functions list.
Here is example code you can put in the Coupon Utility email to allow them to unsubscribe from emails.
If you want to be placed on the Do Not Email registry and only receive emails when you place an order or when there is a product recall, click the email address <a href="http://www.YOURDOMAIN.com/NOEMAIL.html?Action=add&email=%DoNotEmail_E%">%DoNotEmail%</a> Keep in mind, this action will prevent you from receiving emails like this one.
The Coupon Utility module version 5.019 or newer has code in it that will replace the tokens %DoNotEmail% and %DoNotEmail_E% with the 'to' address the email is being sent to. If the email recipient clicks the link they will land on the page NOEMAIL and pass the 'add' action and email address to the Tool Kit donotemail_e (or donotemail) function. With the Coupon Utility module four things need to happen to prevent someone from receiving those emails. a) You need to be using Tool Kit 5.270 or newer, b) You need to be using Coupon Utility 5.019 or newer, c) The tokens %DoNotEmail% and %DoNotEmail_E% must be in the POINTS_E email template, d) The customer would have to click the link to be placed on the Do Not Email registry.
This registry can be used for any module written to interface with it. So, as example, you use the Coupon Utility module to send emails to customers to warn of point expiration. If you have a version of the module that supports it, you can include the tokens %DoNotEmail% and %DoNotEmail_E% in the email template and it will know to check the registry before sending emails. If you do not include that token, the module will skip the registry check and send them emails even if they opted out from Follow-on Contact or Restock Shelves emails. This may upset customers who've told you they only want order emails from you. So if you are going to offer a Do Not Email option, you probably should do it with all modules which send non-order emails. - Create the custom customer fields called pointsdate and pointsmail.
- The first edit on the OSEL page puts a button at whatever location you want it. Important: It cannot go
inside the existing form on the page which collects shipping and payment methods and continues the customer to
the next page. I recommend you put this edit above the existing form on the page for two reasons, 1) it makes it
less confusing if the redeem button is prominently displayed further away from the existing continue button on the
page, 2) you only have to run the token to retrieve the balance once on the page. The first line is the token which
retrieves the balance.
<mvt:item name="couponrd" param="balance" />
<mvt:if expr="l.settings:points:inbasket">
<form method="post" action="&mvt:global:secure_sessionurl;">
<input type="hidden" name="Store_Code" value="&mvte:global:Store_Code;">
<input type="hidden" name="Screen" value="OSEL">
<input type="hidden" name="Action" value="NEW">
<input type="hidden" name="SubScreen" value="CouponRd">
<input type="hidden" name="coupon_id55" value="-POINTS">
<input type="submit" name="cpn" value="Remove Points">
</form>
<br />
<mvt:else>
<mvt:if expr="l.settings:points:balance">
<form method="post" action="&mvt:global:secure_sessionurl;">
<input type="hidden" name="Store_Code" value="&mvte:global:Store_Code;">
<input type="hidden" name="Screen" value="OSEL">
<input type="hidden" name="Action" value="NEW">
<input type="hidden" name="SubScreen" value="CouponRd">
<input type="hidden" name="coupon_id55" value="POINTS">
<input type="submit" name="cpn" value="Redeem Points Now">
<font color="red" size="-1">
<mvt:item name="couponrd" param="misc" />
</font>
</form>
<br />
<span style="font-size:100%;color:#0000ff">
You have &mvt:points:balance; award points in your account. They <br />
can be redeemed for up to &mvt:points:formatted_value; off your order.
</span>
<br />
</mvt:if>
</mvt:if>
- The second OSEL edit is a five line addition to the form which collects shipping and payment info and
goes to the OPAY page. Locate that form on the OSEL page. You will see several hidden inputs, e.g. for
Store_Code and others. At that location, e.g. on the line after the Store_Code line, put the following:
<mvt:if expr="l.settings:points:inbasket">
<input type="hidden" name="points_summary55" value="&mvte:points;">
<mvt:else>
<input type="hidden" name="points_summary55" value="">
</mvt:if>
Note: If this edit is further down the page then where you put the redeem form and button, you will need to include this line <mvt:item name="couponrd" param="balance" /> just before these five lines so it will retrieve the balance and whether points are going to be used in the order.
- Click items at the top of the OSEL page template. Scroll down and make sure couponrd is assigned to this page.
- In the event the customer redeems enough points to make the order $0.00, you will not need to send them to the
payment module. So you need to change the url in the form that posts when they click the button on the OPAY page.
On the OPAY page template, locate the line
<form method="post" action="&mvt:payment:url;">
Replace it with these five lines.
<mvt:if expr="l.settings:basket:total EQ 0">
<form method="post" action="&mvt:global:secure_sessionurl;">
<mvt:else>
<form method="post" action="&mvt:payment:url;">
</mvt:if>
Then a little further down the OPAY template locate the section for payment information. You will create a conditional that shows a different message if the basket total is 0. But if it is not 0, then it will show the original payment information.
<mvt:if expr="l.settings:basket:total EQ 0">
<input type="hidden" name="PaymentMethod" value="">
<div id="payment">
Your balance is zero. Please click the continue button to display the invoice.
</div>
<mvt:else>
Put the original payment info section in this part of the conditional
</mvt:if>
- You will probably want to add a points transaction log to the customer's account page. In a CSSUI store that
page is ACLN. In a MMUI store it is probably best on your ACED page. Locate the display on the page where you
want it.
<mvt:item name="couponrd" param="pointshistory|transactions" />
<mvt:if expr="g.transactions GT 0">
<mvt:item name="couponrd" param="balance" />
You have &mvt:points:balance; award points in your account.
<a href="&mvt:global:secure_sessionurl;Store_Code=&mvta:store:code;&Screen=ACLN&showpoints=1">Details</a>
</mvt:if>
You can see this line with a link includes a variable called showpoints which will expand the code below if clicked.
<mvt:if expr="g.showpoints">
<br class="clear" />
<mvt:if expr="g.transactions GT 0">
<center>
<table border="1" cellpadding="2" cellspacing="0" width="95%">
<tr>
<th align="middle" valign="middle" bgcolor="blue" colspan="5">
<font color="white" size="2">
<b>
Your Awards Points History</b>
</font>
</th>
</tr>
<tr>
<td align="left" valign="middle" bgcolor="blue">
<font color="white">
<b>
Order #</b>
</font>
</td>
<td align="left" valign="middle" bgcolor="blue"">
<font color="white">
<b>
Date</b>
</font>
</td>
<td align="left" valign="middle" bgcolor="blue"">
<font color="white">
<b>
Event</b>
</font>
</td>
<td align="left" valign="middle" bgcolor="blue">
<font color="white">
<b>
Note</b>
</font>
</td>
<td align="right" valign="middle" bgcolor="blue">
<font color="white">
<b>
Points</b>
</font>
</td>
</tr>
<mvt:foreach iterator="history" array="pointshistory">
<tr>
<td align="left" valign="top">
<mvt:if expr="l.settings:history:order_id">
<mvt:if expr="NOT l.settings:history:bill_email">
&mvt:history:order_id;
<mvt:else>
<a href="&mvt:global:secure_sessionurl;Screen=ORDS&Store_Code=&mvta:global:Store_Code;&Order_ID=&mvta:history:order_id;&Order_BillEmail=&mvta:history:bill_email;&Order_BillZip=&mvta:history:bill_zip;">
&mvt:history:order_id;</a>
</mvt:if>
</mvt:if>
</td>
<td align="left" valign="top">
&mvt:history:mm;/&mvt:history:dd;/&mvt:history:yyyy; </td>
<td align="left" valign="top">
&mvt:history:event; </td>
<td align="left" valign="top">
&mvt:history:note; </td>
<td align="right" valign="top">
&mvt:history:points; </td>
</tr>
</mvt:foreach>
<tr>
<td align="right" valign="top" colspan="5">
&mvt:points:balance; </td>
</tr>
</table>
</center>
</mvt:if>
<br class="clear" />
</mvt:if>
- At the top of the ACLN or ACED (whichever you put the above code on), click Items. Scroll down and assign the couponrd item to the page.
- Now test to make sure everything is working.
In addition to adding points after an order, you can use a token to reward points after a specific action by
the customer, e.g. creating a new account. The 1st parameter is addpoints. The 2nd is the text you want
for the event action, e.g. added, adjusted, initialized. The 3rd is the text you want as a note related to
the entry. The 4th is the number of points. You can use a variable which contains the value. Or you can
use the raw number surrounded by the apostrophe character as in the example below. The example below would
add 10 points upon account creation. You would place the code on the page the customer lands on after saving
their new account information.
<mvt:if expr="g.Action AND g.Action EQ 'ICST'">
<mvt:item name="couponrd" param="addpoints|Added|Welcome to our reward points|'10'" />
</mvt:if>
If you selected to not auto-activate the points after an order, you can edit the record in the customer's
admin screen and change the status to active. However, if you are using the manage orders system and
sending the "shipped" emails, you can embed a token which will activate the points for the order being
shipped as the email is being sent. Assign the couponrd item to the shipping email template's items list.
Then put this token anywhere in the page template.
<mvt:item name="couponrd" param="activate|l.all_settings:order:id" />
You can also use the pending transactions form by clicking the + to the left of Utilities and then Coupon Utility. It will display all pending transactions. You can approve their activation or delete them. Check the boxes for the transactions you want to update and then click the update button at the bottom of the page. Fig 14.
If you want to let your customers know how many points were added to their account in the order email, you
can insert text in the template email similar to the below. Change the text so it is appropriate for your
store (store name, expiration period, etc) Be sure to assign the couponrd item to the items list of the
email template.
<mvt:if expr="l.settings:order:total">
<mvt:item name="couponrd" param="newpoints|l.all_settings:order" />
<mvt:if expr="l.settings:newpoints GT 0">
We have added &mvte:newpoints; award points to
your account. These points have no cash value. These points
expire if your account is dormant and no points are added or
redeemed for a period of six months. These points cannot be sold
or transferred to another account. Emporium Plus is not
responsible for lost or expired points. Emporium Plus reserves
the right to discontinue the award points program without prior
notice.
</mvt:if>
</mvt:if>
The coupon utility for importing is accessed under admin:storename:utilities:import
Upload the flat file containing coupons through admin. Name the flat file
coupimpt.dat. It contains the coupon code, expiration date, value,
minimum order amount to qualify, reduce tax, usage once or many or one per
customer, good for which codes, good only for specific codes when
calculating, calculate as fixed or percentage, maximum redemption value,
limit to number of uses, instant coupon on product page, zone, price groups,
label (label added in version 5.052), and start date (start date added in version 5.054). For
example:
SPRINGSALE^20110621^10.00^0.00^1^O^1AA0*|^1^%^50.00^0^0^SC-US|CA^Wholesale|Premium^Spring Deals^20110625
Leave the last line of coupimpt.dat blank
The above fields are:
- Coupon code in upper case letters or numbers
- Expiration date as YYYYMMDD
- Redemption value
- Minimum order amount equal to or greater than the redemption value if the redemption value is a fixed amount
- Whether to make a taxable or non-taxable deduction (1 = yes, 0 = no)
- Usage: M = multiple times, O = one per customer, S = single use
- Good for specific codes. Normally a list of product codes, each terminated with a | character. You can use an asterisk (*) as a wild card, ie all product codes beginning with 1AA0 in the above example would apply. The asterisk only applies to the beginning characters in the product codes.
- Good only for the product codes listed. If 1, then the discount will only be calculated for the eligible product codes when applying the percentage calculation. If 0, then the discount will apply to all products in the order if using the percentage calculation.
- Calculation is either empty if the coupon is a flat amount value or a % if it is to be multiplied times the cost of products. If it is to be used for free shipping, use S.
- Maximum value is used when limiting the redemption value of a coupon which is a calculated percentage. This number is not necessary if the value of the coupon was already set as a fixed amount.
- Limit is the number of times a coupon can be used if multiple usage. Leave as 0 if not limited.
- Instant determines location for coupon redemtion; 1 is on product page, 0 is at checkout or other pages
- Zone is a | separated list of country codes if you want to limit the coupon usage.
- Price group is a | separated list of price group names which can limit coupon usage.
- Label is an optional label you want to appear in the basket with the coupon. If left blank it uses the default label. This column was added in version 5.052 of the module.
- Start date as YYYYMMDD
Beginning with version 5.052 of the coupon module you can import just the
coupon codes and assign them to a coupon template. This is useful if you
receive a csv file of coupon codes from social coupon sites like Groupon. The
coupon codes must be in the first column and the columns separated with the
comma. All coupons in the file will have the same rules. Those rules are
defined in the coupon template. So first create a coupon template like you
do for the coupon code generator (see next section). Go ahead and put the
number of days for expiration. You can override that when you do the import.
Assign it a code which begins with #, e.g. #1000. Then in the coupon import, select
"Social Coupons (csv file)". Enter the template code. If you want the coupons
to expire on a certain date, enter the date in the format YYYYMMDD. I would run a small
test with just one or two lines in the csv file to make sure you have the
methodology correct. Then check to make sure those coupons generated and the rules
look correct. If they are, delete them and then run the whole file. It is easier
to delete one or two test coupons than having to delete a thousand bad coupons.
In most cases the social coupon site will provide you with the list of codes. In
some cases they expect you to provide the list. Beginning with Coupon Utility module
v5.016 you can create a list of unique, random codes and have it emailed to you. Then
you can import that list of codes just like you would any other social coupon site
list. In the form you indicate how many codes you want. If you want to add a
prefix to the codes you can, e.g. SALE- You enter the length of the random part
of the code. Enter the email address you want to send the codes to. Then click
the Generate button. In this example all of the codes would begin with SALE- and then
be followed by the random characters, e.g. SALE-IMOWPASH.
You can generate a unique code and display that code to the customer at runtime.
The first step is to create a coupon template. You create it just like you create all other coupon codes except for two fields. The CODE must begin with the # character. Then it is followed by a number, e.g. #3 You will probably put some other text after that, see below. The other field which is different is the date of expiration. Instead of a fixed date in the format YYYYMMDD, you will enter the number of days from the coupon code generation, e.g. 10 You should keep the expiration short to minimize the number of coupons in your system and promote short term redemption.
Then, using a module like our Mail Manager, you will include the token to run the coupon generator. As an example, the token %module|couponrd|3% could be inserted in a Mail Manager generated welcome email or its customer confirmation email. Every time that email with token is run, a unique coupon code with parameters matching the template would be created and displayed to the customer. Hence, the #3 template would be used and would have an expiration 10 days from the current date of the email. If you don't have our Mail Manager module for generating HTML formatted emails, you can place the token in the token areas of other email modules capable of using this style token. That said, you may want to invest in our Mail Manager module as its features are similar to other HTML formatting email modules and is much less expensive.
An advanced feature in the coupon generator is the ability to prepend a series of characters before the unique coupon code to create easily identifiable sub-coupons. For example, suppose we want to prepend FLW- to all of the coupon codes generated through our Follow-on Contact module. In the coupon module we could have a template with the CODE of #4~FLW- Then in the contact email body we could include the token %module|couponrd|4~FLW-% The required portions of this 3rd parameter are that the parameter begins with a number. The number is followed with the tilde character (~). Then the characters we want prepended to the random, unique coupon code. This would result in a coupon code like FLW-LPQTSMVR The beginning is a constant (FLW-) which is easily tracked in the report module so you can judge effectiveness of specific marketing campaigns. You can also list the current sub-coupons from each template by clicking the convenient link in the master list of coupons. The next eight characters are randomly generated. Keep in mind that this has the ability to automatically generate hundreds or thousands of unique coupon codes so you will probably want to keep your expiration time short.
Another use of the coupon generator is to generate a unique coupon on any template page in your store. The format of a render token is a little differnt from the module token. As example, to put a render token on a template page, you would use the token <mvt:item name="couponrd" param="3" /> which would have the same result as the #3 module token above. Don't forget to also assign the couponrd item under the item list for the page you put it on. Similarly, <mvt:item name="couponrd" param="8~BONUS-" /> for a coupon template that prepends tracking code as part of the coupon. Beginning with coupon module version 5.042 we added a second paramter to the render token format. Normally you would not use this parameter. However, in our Deal of the Day we needed a way to dynamically change the product code the token could be used for. Using the Emporium Plus Tool Kit we create a variable called override which has the value of the discount product code plus the | character at the end of the code. Then on the DEAL page we have the render token <mvt:item name="couponrd" param="22~DEAL-|g.override" /> The coupon setup that goes with this token has #22~DEAL- for its coupon code. It has the number 0 for the expires date, thus making it expire at midnight of the current day. It has 10 for the value and is a percent discount coupon. For the products eligible it is blank as it will receive that value from the token. Make sure you check the box "Apply % Discount Only to the Above" so that only the dynamically inserted product will be discounted. Then check the box for Instant coupon since this will be an instant coupon type redemption, just not on the product page.
If you use multiple use coupons and have a limit set and want to display the number remaining of a specific coupon code to customers, you can use a token to retrieve the amount as a variable. Then display a message. You would use a render token in the format <mvt:item name="couponrd" param="~XXXXXXXX" /> where you want a to calculate the number of a specific multiple coupon remaining when it is limited. Begin the param with "~". The "XXXXXXXX" represents the coupon code. After calculating, you can access the variable cim_multi_coupon_remaining to display that number with standard Miva page template code. As example, let's say you are running a sale on your site for the first 20 customers. You could include the following code (example coupon code here is DEALS) on the storefront or whereever you thought is would be noticed. Don't forget to also assign the couponrd item under the item list for the page you put it on.
<mvt:item name="couponrd" param="~DEALS" />
<mvt:if expr="g.cim_multi_coupon_remaining GT 0">
&mvte:global:cim_multi_coupon_remaining; DEALS coupons remaining
<mvt:else />
All DEALS coupons have been used
</mvt:if>
In the main coupon redemption configuration menu you can select the Usage Reports tab. Or under admin:storename:utilities you can also access the same report. You can summarize or list each coupon used for a specific time period. You can also restrict the output to a specific coupon code or a string of characters in a coupon code. This latter is useful when you have assigned a series of sub-coupons to an affiliate or advertising campaign. You can determine how much business was brought in with the coupons from various sources. When you run the report in "itemize" mode and you include your email address in the email input, the module will send you an email with an attachment listing all of the email addresses in the report. Depending on your privacy policy you could then use this list to contact them with more coupons.
If you want even more analytical ability, a historical database, which can be imported and analyzed in database or spreadsheet software, is maintained on all coupons used. The couponuz.dbf can be FTPd to your PC for further analysis in MS Access, MS Excel, or other data management software. This could be useful in determining which coupons bring you the most activity.
Q: The prompt to enter the coupon code during checkout is not showing up.
A: You may have skipped the Editing Requirements section. Make sure you insert the render token in the template for the OSEL page and you assigned the Coupon Redemption under the list of items for that page. Then, check the opay, prod, and patr template pages for those two required steps.
Q: After the customer enters the coupon code, the discount is not applied to the order.
A: Make sure that the Coupon Redemption module is "assigned" to the store under the store's System Extension Configuration screen.
Q: I created an instant coupon for redemption on the product screen. After the customer enters the coupon code, the discount is not applied to the order.
A: Make sure that the CIM Activity Log module is "assigned" to the store under the store's Logging Configuration screen.
A: Make sure the input is inside the add to basket form. Commonly, store owners have put that token below the add to basket form so that the form submission did not post the value.
Q: I installed the module and now there is a promotion code prompt showing on the individual product screens. I only want to redeem coupons during checkout and on the basket page so how do I get rid of the input on the product screen?
A: If you do not want to use the instant (promotion) coupons on the product screen, erase the text in the input at admin:stores:order fulfillment settings:coupon redemption admin tab for Instant Coupon Prompt and/or do not put the render token on the prod template page.
Q: In the Order Fulfillment Settings:Coupon Redemption (coupons tab) there is a Find: text input. What is that for?
A: It is so you can skip to the coupon you are looking for without having to click screen after screen. If you have a coupon code of XYZ, then you would enter XYZ in the input and click the Go button.
Q: I have installed Google Checkout module in my store and I don't know how to configure it to use coupons.
A: If you are using my coupon module version 5.013 or newer, you can add it as an "extension" to the Google Checkout module. Go into Payment Settings, click on Google Checkout tab at the top of the page, click the Extensions link. Click the Add button and under Module Code, type in couponrd. Type should be preset as "Coupon". If you are using coupon module version 5.012 or older, you will need to update the coupon module through the store you got the original from.
Q: I updated my coupon module and now the free shipping coupons are not working.
A: You probably forgot to update the CIM Activity Log (cim_log.mvc). Check admin > global settings > modules and make sure the CIM Activity Log is version 5.018 or newer. If you have coupon module version 5.052 or newer, your CIM Activity Log needs to be 5.019 or newer. If not, update it.
A: Check to make sure the CIM Activity Log is assigned to the store in the Logging Settings menu.
Q: When a customer adds a coupon from the basket coupon input, is there a way for them to remove it?
A: Yes. If they put a minus character followed by the coupon code and submit from the basket coupon input, it will remove that coupon from the basket.
Q: Can a customer redeem more than one coupon per order?
A: Yes. Instant coupons can be redeemed at the product page. You can have more than one per order. Also, the basket coupons can be more than one per order. In the coupon module "admin" tab, you can set the number of coupons per order that are allowed.
Q: I have inserted the tokens and code for the points redemption feature but it is not applying the points to the basket when I click the button.
A: Make sure you created the POINTS coupon. Make sure you created the pointsdate and pointsmail custom CUSTOMER fields. Make sure you inserted the license key in the Coupon Utility module's admin screen. This key is different from the key in the Coupon Redemption module's admin screen.
Still have a question?